
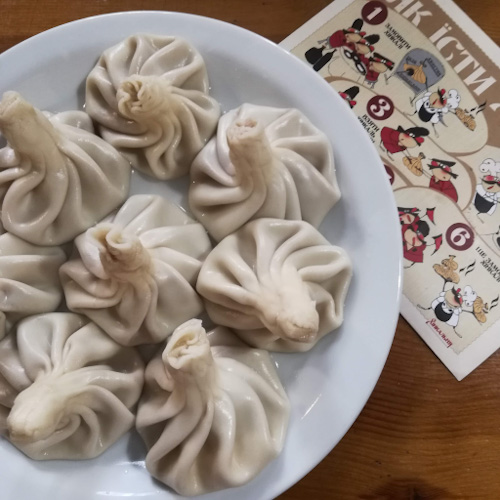
We are VERY excited to share our khinkali recipe. They were at the top of our list of things we wanted to learn to cook when we started this blog. Read on to learn how to make khinkali, how to eat khinkali, and even more about these delicious Georgian dumplings.
It’s hard to tell any story of travel or food or why we blog without talking about khinkali (ხინკალი).
We only first tried them a few years ago by chance and now always seek out Georgian restaurants when we go somewhere they might be. (In fact, we wrote a whole post about how they are a food worth traveling for.) We’ve honestly learned a lot about the country of Georgia simply because we became so enamored with the cuisine; we desperately want to visit one day.
Khinkali just make us very happy.
And yet, khinkali are just dumplings.
If there is a bad version of a dumpling in the world, we have yet to consume it. Dumplings are wonderful, and can be found in most cuisines. But these are unique due to their fun shape, soupy interior, and eating etiquette.
Khinkali are typically filled with meat and a bit of liquid so they are in fact soup dumplings. They have handles – called kudi (კუდი), which actually means “tails” – to help you eat them properly.
They are special and truly one of our favorite foods. And now we cook khinkali on nights when we are happy, nights we are sad, and nights we crave khinkali.
How to make khinkali
Khinkali were intimidating to make the first time. We truly revere them and wanted to get them right. We are happy to say that they are not overly hard or weird. As we said, khinkali are just dumplings.
Ingredients
You can really make khinkali with any ground meat. We’ve made them with a beef/pork mixture, but settled on lamb as our go-to for this recipe. Lamb has a stronger flavor and we just really like how it tastes with all the spices. We also rarely eat lamb so that makes our recipe a little more special.
The herbs and spices that flavor the lamb are: ground coriander, ground fenugreek, dried thyme, caraway, ground cumin, and fresh parsley and cilantro.
Fenugreek may be new to you. We hadn’t seen it recipes until we started exploring Georgian cuisine, of which it is a staple ingredient. Now we look to put it in lots of things (like our carrot apple slaw). It has a flavor unlike any other spice we have in our cabinet, with a sweet flavor akin to maple syrup.
Fenugreek is used in curries, and in that case maple syrup would be a good substitute. But we would not recommend adding maple syrup to your khinkali. If you do not have fenugreek, buy some (trust us, it’s delicious and versatile), or try a little sweet curry powder.
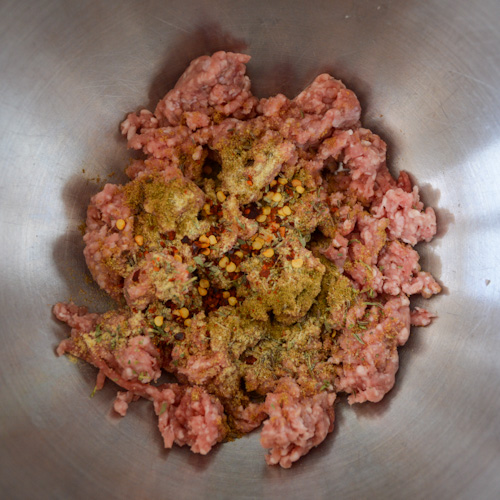

The soupiness in the dumplings is created with melted butter and broth (we use beef broth, but you could use whatever you have on hand or even water).
The dumpling dough is simple and not at all unique. It consists of flour, salt, water, and egg.
Recipe tips
The first khinkali recipe we read said it would take just over an hour to make them. It ended up taking us closer to three. If you are a master dumpling maker, perhaps it will take you less time. If not, give yourself time or don’t stress when you end up eating dinner at 10pm.
Making the dough is easy. Making the filling is easy. But putting them together to make khinkali can be tricky and a bit time intensive. We’ve included our complete method in the recipe card below, but wanted to call out some specific khinkali recipe tips to help you out.
Make the dough first and then set it aside (covered in an oiled bowl) to rest for at least 15 minutes.
When making the filling, first prepare your aromatics. Mince the onion as fine as you can, and if you don’t have a garlic press, take the time to create a paste with some salt. It’s worth it.
Combine the meat with all the herbs, spices, aromatics, and melted butter. Then add the broth to the mixture a little at a time and mix with a fork to help it absorb. It’s a little weird adding liquid to ground meat (at least we thought it was). You may think that it will never come together. But it does! And the liquid is what makes these Georgian dumplings unique, so it’s imperative.
When working with the dough, keep your flour at the ready. You’ll need it throughout the entire khinkali-making process.
After cutting the dough into thirds, you’re going to roll each ball out into a 1/4-inch thick circle. Work with one ball at a time, making one batch of six dumplings at a time.
During our first attempt, we rolled the dough out way too thin. Unless you know what 1/4 inch is by sight, give it a measure with a ruler or a measuring tape. And err on the side of thicker than thinner.
You’re then going to take a cutting round or a small bowl/drinking glass and a knife and cut the dough circle into 2 1/2-inch circles. You can reroll the scraps if necessary.
Roll each disc out into a larger circle, approximately 4 inches in diameter, rolling the edges of the dough to be a tiny bit thinner than the center.

Place a tablespoon of filling into the center of each piece of circle. Not a heaping tablespoon. A level tablespoon. If there’s too much meat, it will be difficult if not impossible to properly close your dumpling.
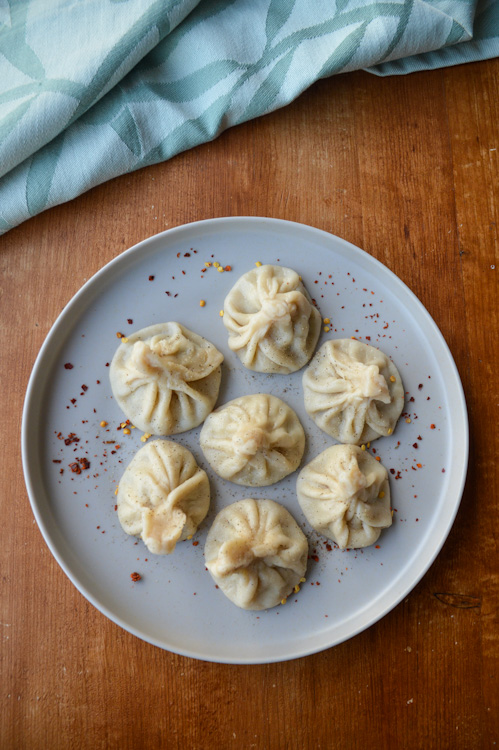
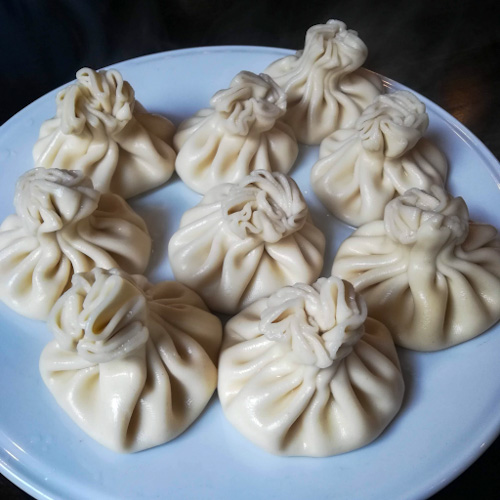
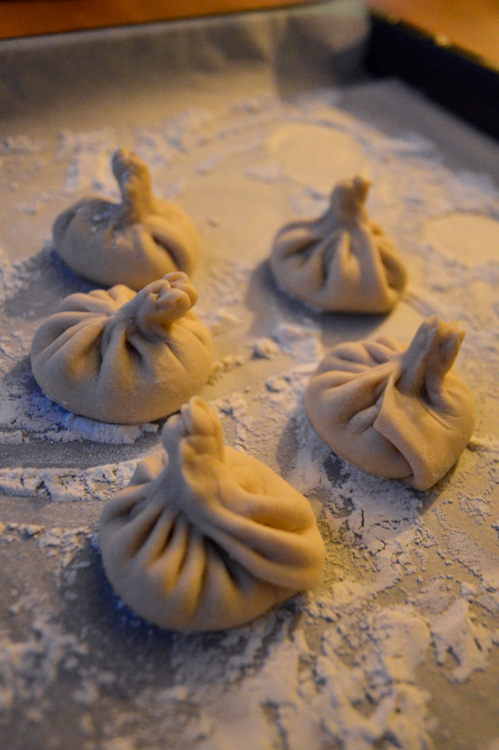
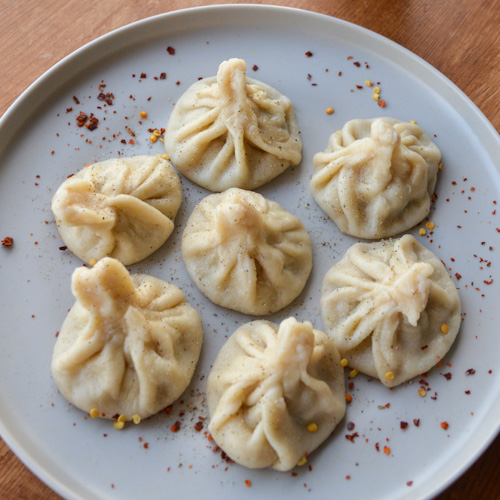
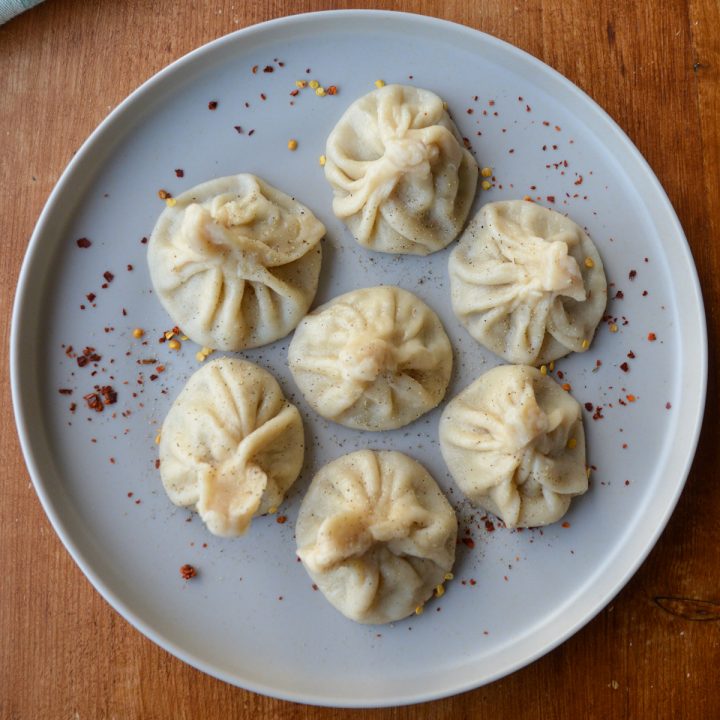
Crimp or pleat the dough’s edge and twist to create a stem to form a dumpling. They look like little tiny purses or sacks.
We use both hands to pleat the dough, folding the edges over and over like making a fan. Be careful not to get raw filling on your fingers as you fold the dough. It will make it very difficult to seal.
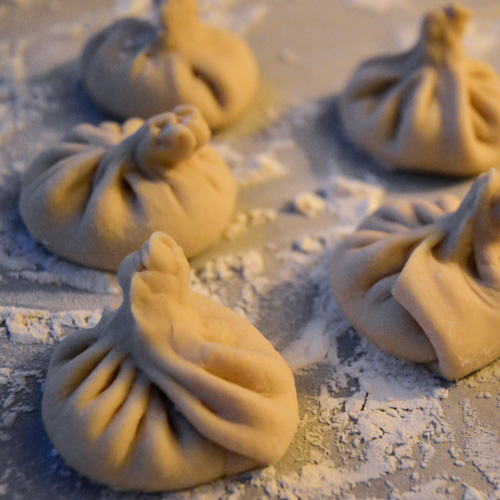
We’ve read that khinkali traditionally have 19 pleats. We’re still working on that and usually can get around 16.
Once you’ve properly formed and sealed a dumpling, place it on a sheet pan lined with parchment and well-floured, and cover with a tea towel. If you don’t flour it, the dumplings will stick.
How to cook khinkali
Cooking these Georgian dumplings is much easier than making them. We just have a few tips here.
Start boiling your water when you’re about to start making your last batch of dumplings. Don’t forget to add the bay leaves and salt the water (we’ve made both errors).
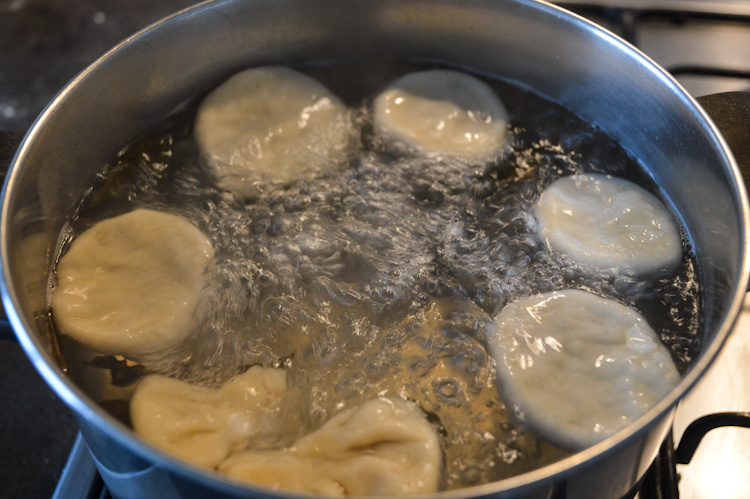
Depending on the size of your pot, cook 6-9 dumplings at a time. This means you’ll be making 2-3 batches.
After you add the khinkali into the boiling water, some will sink to the bottom. Use a wooden spoon to gently make sure they don’t stick to the pot (this has happened to us and it’s quite disappointing).
The dumplings take 8 minutes to cook. During that time, you may need to turn the heat down to ensure the boiling water doesn’t become too vigorous, breaking open your beautiful khinkali (this has also happened to us).
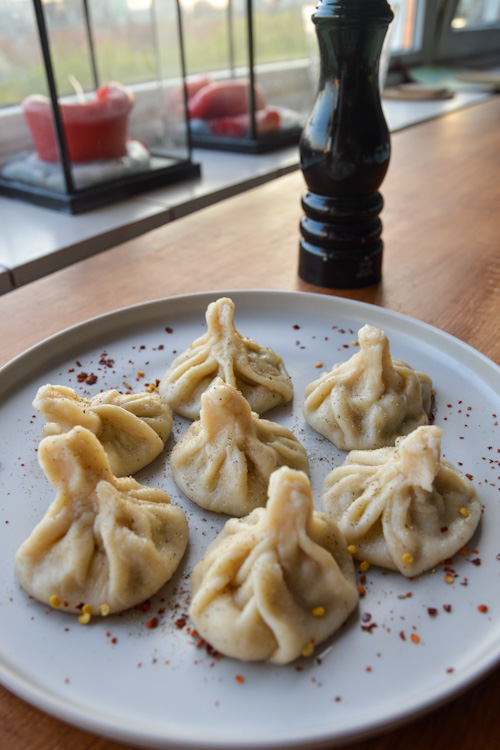
When the 8 minutes are up, remove your dumplings with a spider and set them carefully on a plate. Immediately crack fresh pepper on them. This is a must.

For more heat, serve them with crushed red pepper flake. For more decadence and deliciousness, serve them with a side of crème fraîche or sour cream. Our eggplant pkhali would be a tasty side dish or appetizer.
How to eat khinkali
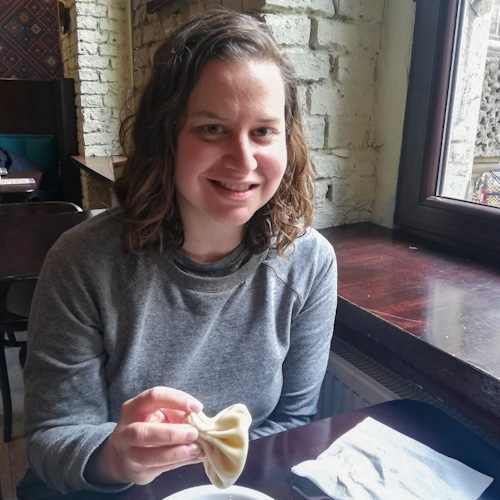
Khinkali are trickier to eat than most dumplings. In fact, one particular restaurant chain we frequent has instructions on the table so you know what to do.
Even though you’ll want to eat your khinkali asap after removing from the water, let them sit a minute or two before digging in. There’s hot liquid in there!
Eat khinkali by holding them fat side up by their handle. Bite a small hole and slurp out some of the broth. Then consume the rest of the dumpling quickly. Do not let the broth escape!
Handles (kudi/კუდი) are not normally eaten. They can be pretty dense. People leave them on the plate to count (or boast about) how many dumplings they’ve consumed.
We must admit that we’ve been known to disregard this rule at home, since the kudi on our khinkali are a bit smaller than the ones we’ve gotten at restaurants.
If you happen to have any leftover filling (sometimes we do, sometimes we don’t), we have two recommendations. Freeze it to make more khinkali in the future. Or, add some breadcrumbs, roll them into balls or patties, and fry them up.
Eet smakelijk!
Khinkali - Georgian Dumplings
We are VERY excited to share our khinkali recipe. They were at the top of our list of things we wanted to learn to cook when we started this blog. Read on to learn how to make khinkali, how to eat khinkali, and even more about these delicious Georgian dumplings.
Ingredients
For the dough
- 2 cups all purpose flour, plus more for kneading and rolling
- 1/2 tsp salt
- 1/2 cup water
- 1 egg, beaten
- 1/2 tsp olive oil
For the filling
- 7 oz ground lamb (or beef or pork or beef/pork mix)
- 1/4 cup onion, finely minced
- 1 garlic clove, crushed or minced into a paste with salt
- 1 Tbsp fresh cilantro, roughly chopped
- 1 Tbsp fresh parsley, roughly chopped
- 3/4 tsp ground coriander
- 1/2 tsp fenugreek
- 1/2 tsp salt
- 1/4 tsp dried thyme
- 1/4 tsp caraway seeds, chopped
- 1/4 tsp black pepper
- 1/8 tsp cumin
- 2 Tbsp unsalted butter, melted
- 3/4 cup beef broth
For cooking the dumplings
- 4 dried bay leaves
- Salt (a generous shake)
For the toppings
- Fresh ground black pepper
- Crushed red pepper flake
- Crème fraîche or sour cream
Instructions
Make the dough
- Combine flour and salt in a bowl with a whisk. Add the water and beaten egg and form the dough into a ball.
- Turn the dough out onto a floured surface and knead for about 5 minutes until smooth.
- Oil the same bowl and plop the ball of dough in. Cover and set aside for at least 15 minutes.
Make the filling
- Combine all filling ingredients except the broth in a bowl. Add broth to the mixture a little at a time and mix with a fork to help it absorb.
Make the khinkali
- Cut your dough ball into 3 smaller balls. Keep 2 covered in the oiled bowl as you work.
- Roll out the dough onto a lightly floured surface until it is about 1/4-inch thick. Using a round cutter or a drinking glass and a knife, cut the dough into 6 2-1/2 inch circles. You can reroll the scraps if you need to (we do).
- Roll each disc out into a larger circle, approximately 4 inches in diameter. Roll the edges of the dough to be a bit thinner than the center. Lightly dust the surface and/or rolling pin with flour as needed through this process.
- Place a tablespoon of filling into the center of each piece of circle. Crimp or pleat the dough's edge and twist to create a stem to form a dumpling.
- Put each dumpling on a floured sheet pan and cover with a towel until ready to cook. Make sure the dumplings don't touch each other.
- When you're about to start your last batch, start boiling a large pot of water with the bay leaves.
- When the water is boiling and your dumplings are ready to go into the pot, salt the water generously. Gently lift each khinkali by their bottoms and put them in the boiling water.
- Cook your khinkali in batches of 6 or 9, depending on how large your pot is.
- After adding the dumplings to the boiling water, gently use a wooden spoon to ensure they're not sticking to the bottom of the pot.
- Cook each batch for 8 minutes. Adjust the heat if necessary to ensure a rolling, but not violent boil (you don't want the dumplings to break open while cooking).
- Remove the dumplings with a spider and set on a plate.
- Serve with freshly cracked black pepper. If you want a little more heat, you can also serve with crushed red pepper flake. If you want even more deliciousness, serve with crème fraîche or sour cream.
Notes
- Be careful not to get raw filling on your fingers as you fold the dough. It will make it very difficult to seal.
- When lifting the khinkali into the water, do so by their bottoms, not their handles - otherwise they are more likely to get misshapen.
- We've read that khinkali traditionally have 19 pleats. We're still working on that and usually can get around 16.
- Even though you'll want to eat your khinkali asap after removing from the water, let them sit a minute or two before digging in. There's hot liquid in there!
- Eat khinkali by holding them fat side up by their handle. Bite a small hole and slurp out some of the broth. Then consume the rest of the dumpling quickly. Do not let the broth escape! Handles (kudi/კუდი) are not traditionally eaten. However, our homemade khinkali have smaller kudi than the ones we've gotten at restaurants so we have been known to eat them.
- If you happen to have any leftover filling you can freeze it to make more khinkali in the future. Or, you can add some breadcrumbs, roll them into balls or patties, and fry them up.

Hey, Sarah:
It looks like fun to do all those fancy ways thank you, I enjoy many of your recipes.
Lance
[…] dumplings. Just as gooey and heartwarming as we had remembered. << Make them yourself: Our khinkali recipe >> Banitsa in Sofia, […]
13 pleats is said to be standard according to my Georgian girlfriend and her family who all live in Tbilisi and have been making/eating these amazing plumplings for generations. As a chef I can say that aiming for 20+ pleats would be pointless and would actually weaken the dough causing cracking and leakage of the beautiful broth inside.
It could be that it’s just a family thing for them to do 13 pleats but I believe there’s a cultural reason behind it.
You’re also talking about a culture with a lot of protective instinct surrounding their cuisine since the oppressors (Russians) continuously try to lay claim to Georgian dishes (and people). So maybe as an outsider the information you’re getting is purposely incorrect. Similar to buying a cookbook from a famous chef, you are not buying the real recipes, they are always altered to prevent you from achieving the best version of the dish.
Oh wow. I had had these at a fancy restaurant in town where the owner grew up next to some Georgian neighbors and often includes certain Georgisn dishes in his rotating menu. This recipe is absolutely delicious. I’m so proud of how they came out, it’s like I can’t believe I actually made something this good. I doubled the recipe (glad I did!) and used all pork. Otherwise followed exactly. Thank you!
We are thrilled to read about your experience with our recipe! We felt exactly the same way the first time we made them. It is labor intensive but worth all the effort. So glad you enjoyed them.
These are absolutely delicious – exactly like those I had at a Georgian restaurant in Italy, that I could not stop thinking about. Imagine Georgian food be the highlight of a trip to Italy where all the food is wonderful! I generally do not have the time, dexterity or courage to make the dumpling cases, so I make the meatballs as written, but only put about half the broth in them, then I boil them in broth with bay leaves and serve them as a soup with pappardelle or other large, flat pasta to give the taste and texture of the dumpling cases. They turn out absolutely perfect if you follow the proportions of spices exactly. If you use a little more or less of something they are still delicious, but they don’t have the true flavour. They work perfectly with beef, pork, lamb, or any combination of those meats. I also throw in a handful of minced parsley and cilantro just before serving. The combination of the two is magic! Thank you so much for posting this!